Content
Categories
- General SWPanel (38)
- Administration (14)
- Database (14)
- SSL Certificates (15)
- Cloud (59)
- Cloud Storage (2)
- Containers (1)
- Backup Copies (6)
- Mail (33)
- DevOps (55)
- Domains (33)
- FTP (6)
- Hosting (32)
- Migrate Services (6)
- DNS Registers (13)
- Security (12)
- Services (7)
- Support (5)
- Users and privileges (2)
- Web (15)
- WordPress (23)
How to clone a Hosting on your Cloud server with SWPanel
Cloning a Hosting can be useful to have another hosting service, using another domain name or subdomain with the same web data of the original hosting. In this manual we will show you how you can clone your Hosting hosted in a Cloud with SWPanel.
danger This cloning method is only applicable to hostings that are hosted in a private Cloud with SWPanel.
If you do not have a Cloud with SWPanel, you can contract one and move your hosting into it, following the instructions in the following manuals:
Below, we mention the data and features will be cloned on the new hosting:
The following features/content is cloned:
- Hosting Content
- Hosting Databases
- PHP and WordPress settings of the Hosting
The following features/content is NOT cloned:
- Email accounts
- DNS records
- FTP accounts
- Crons
Clone a Hosting
- First of all, you must go to the Dashboard --> Active Services Tree --> Menu [...] of the Hosting --> Clone this Hosting:
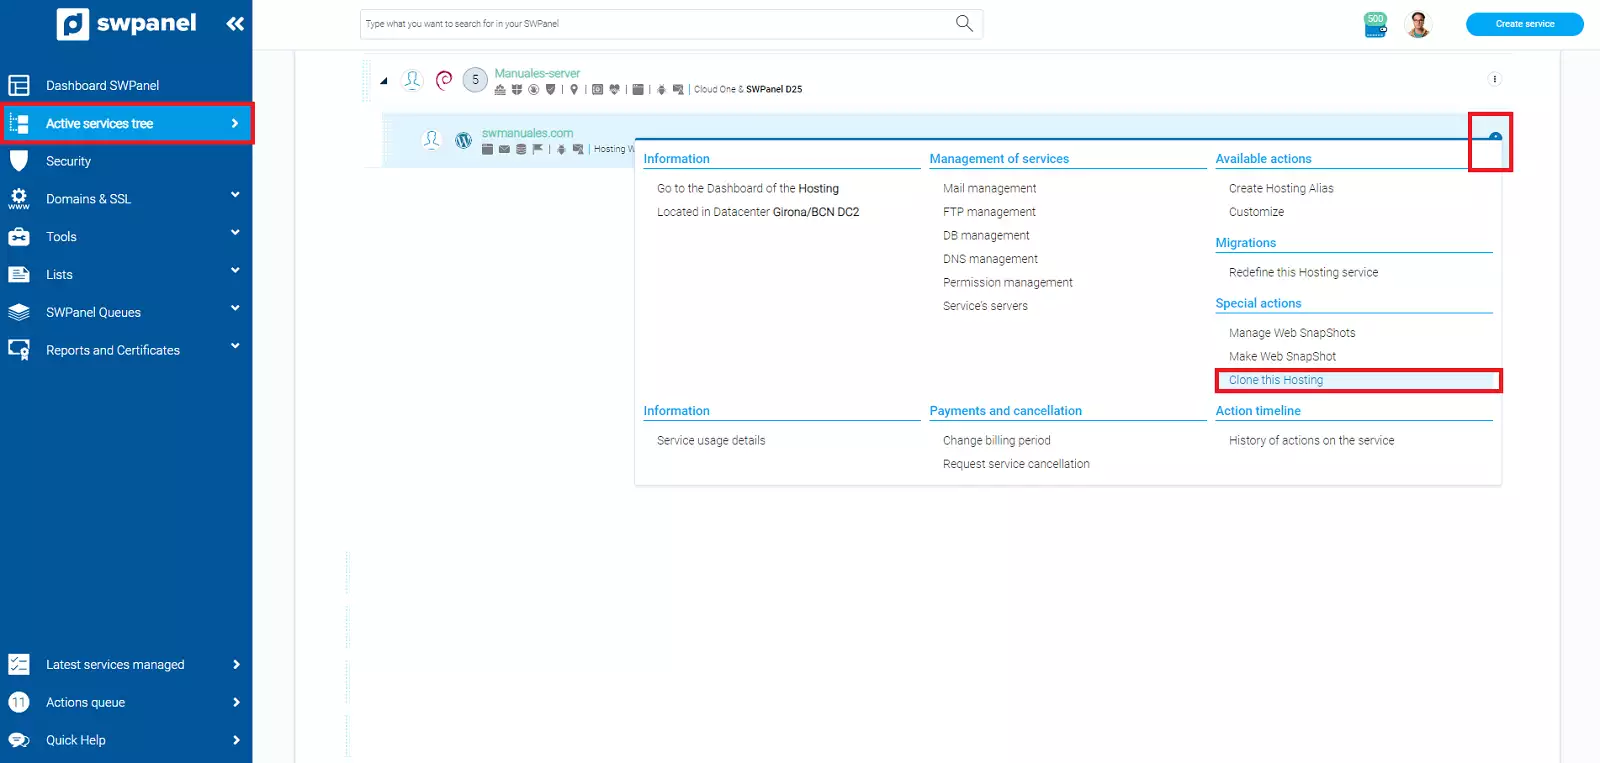
info_capture The screenshot is for guidance only. It was taken on version 2025.00.0017 with date 29/12/2024. It may differ from what the current version of SWPanel displays.
- A window will open in which we can select which resources we want to clone (Web / Databases) and set a domain name for the new hosting service:

info_capture The screenshot is for guidance only. It was taken on version 2025.00.0017 with date 29/12/2024. It may differ from what the current version of SWPanel displays.
info The new database and database user will have the name "clon_" or "clone_", followed by the original name of the database or user. Example:
- clon_BBDDoriginal
- clon_usuarioBBDDoriginal
- Click on Accept and create, and the cloning process will start:

info_capture The screenshot is for guidance only. It was taken on version 2025.00.0017 with date 29/12/2024. It may differ from what the current version of SWPanel displays.
info You must keep in mind, for the cloned Web to work correctly, you will have to reconfigure the connection to the internal DB and possibly relative URL links that your Cloned Web is using. If you do not make these modifications, the cloned website will still be connected to the source website's database and it is possible that some web links are still using the source domain name.
Configuring a Cloned WordPress
In case your cloned website is a WordPress, we provide you with all the modifications you would have to make in order to make your WordPress site work with the new URL.
info By default, your cloned WordPress will remain connected to the original DB and will continue to use the URL of the original domain. In order for your Cloned WordPress to load your content correctly with the new domain name, it will be necessary:
- Connect your WordPress to the Cloned DB.
- Replace the old WordPress URLs in the Cloned DB with the new URL.
- First, we will modify the file "wp-config.php", accessing the Hosting Dashboard → Service management → File manager → "wp-config.php", click on Edit file:
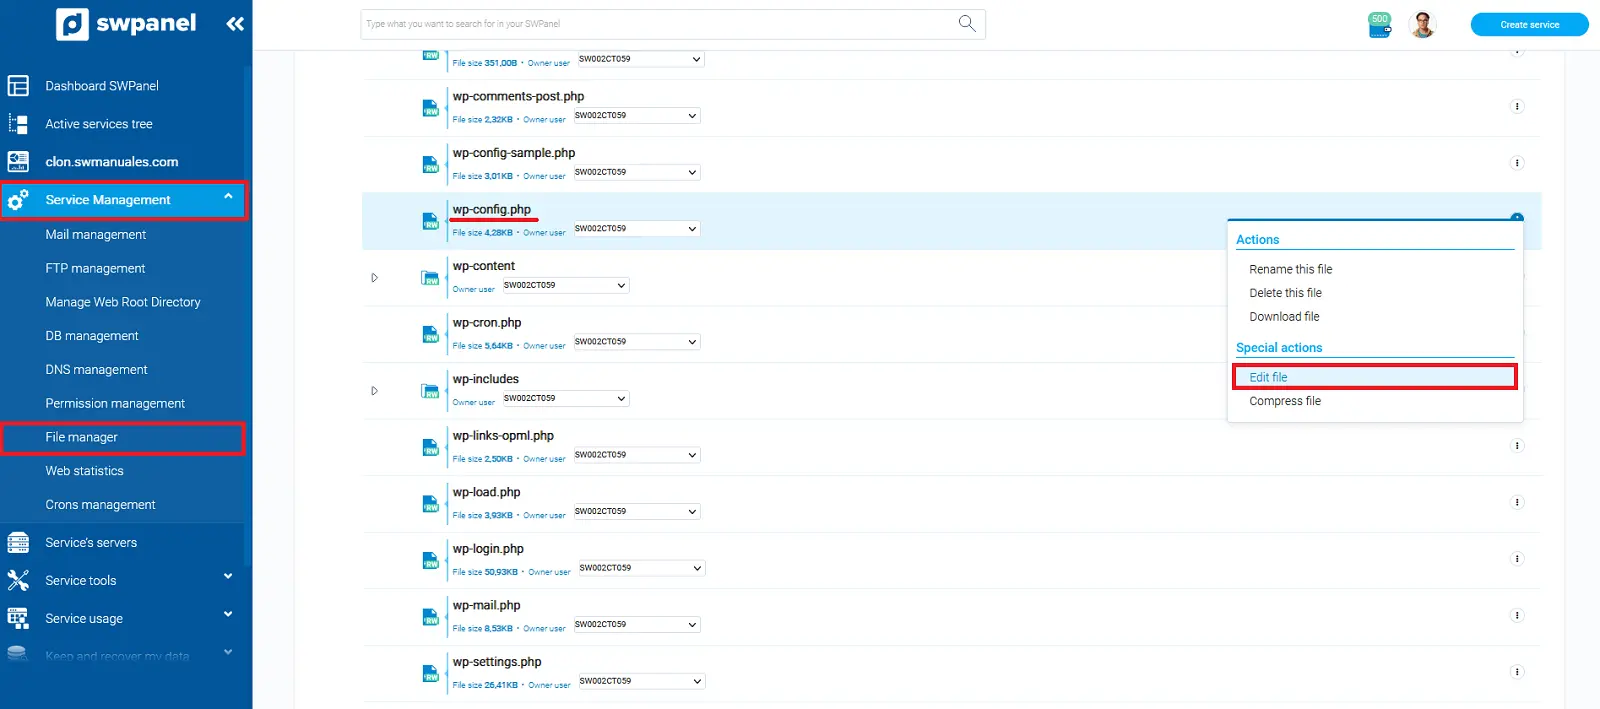
info_capture The screenshot is for guidance only. It was taken on version 2025.00.0017 with date 29/12/2024. It may differ from what the current version of SWPanel displays.
MySQL Data
This is the access data that WordPress uses to connect the website to the database. You will need to enter the name of the cloned DB and the cloned DB user.
info The names of the cloned DB and the cloned DB user, you can consult them by accessing Service management --> Database management.
The lines to be modified are the following:
/** The name of the database for WordPress */
define( 'DB_NAME', 'NAME_WP' );

/** MySQL database username */
define( 'DB_USER', 'USER_WP' );
- After connecting the WordPress to the cloned database, we can access via phpMyAdmin and replace the old URL with the new URL, mainly to gain access to the administrator area of the cloned WordPress.
You can access phpMyAdmin by entering the URL of your domain, followed by "/phpmyadmin":
- dominionuevo.com/phpmyadmin
Once inside, you can modify the old URL to the new URL by placing the following command in SQL queries if your WordPress was installed through SWPanel:
UPDATE wpsw_options SET option_value = replace(option_value, 'dominioantiguo.com', 'nuevodominio.com') WHERE option_name = 'home' OR option_name = 'siteurl';
If your WordPress was not installed through SWPanel, you can use the following:
UPDATE wpsw_options SET option_value = replace(option_value, 'dominioantiguo.com', 'nuevodominio.com') WHERE option_name = 'home' OR option_name = 'siteurl';
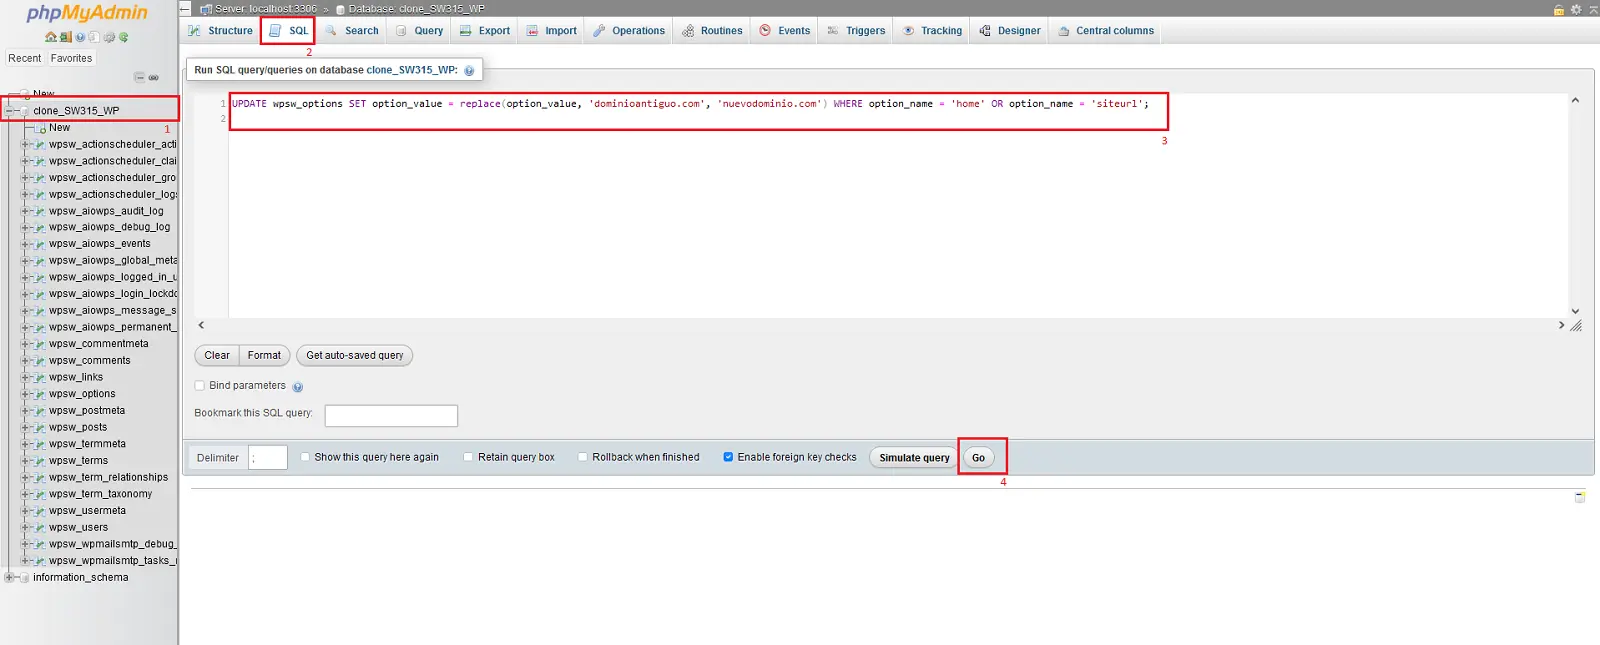
info_capture The screenshot is for guidance only. It was taken on version 2025.00.0017 with date 29/12/2024. It may differ from what the current version of SWPanel displays.
info The prefix of your WordPress tables may NOT be wpsw_. In case that is not the prefix we will have to check which is the correct one from the left panel, changing the prefix wpsw_ for the corresponding one.
You can check the changes. By expanding the wpsw_options, table, checking the siteurl and home, fields, they will have the new URL we have previously set:
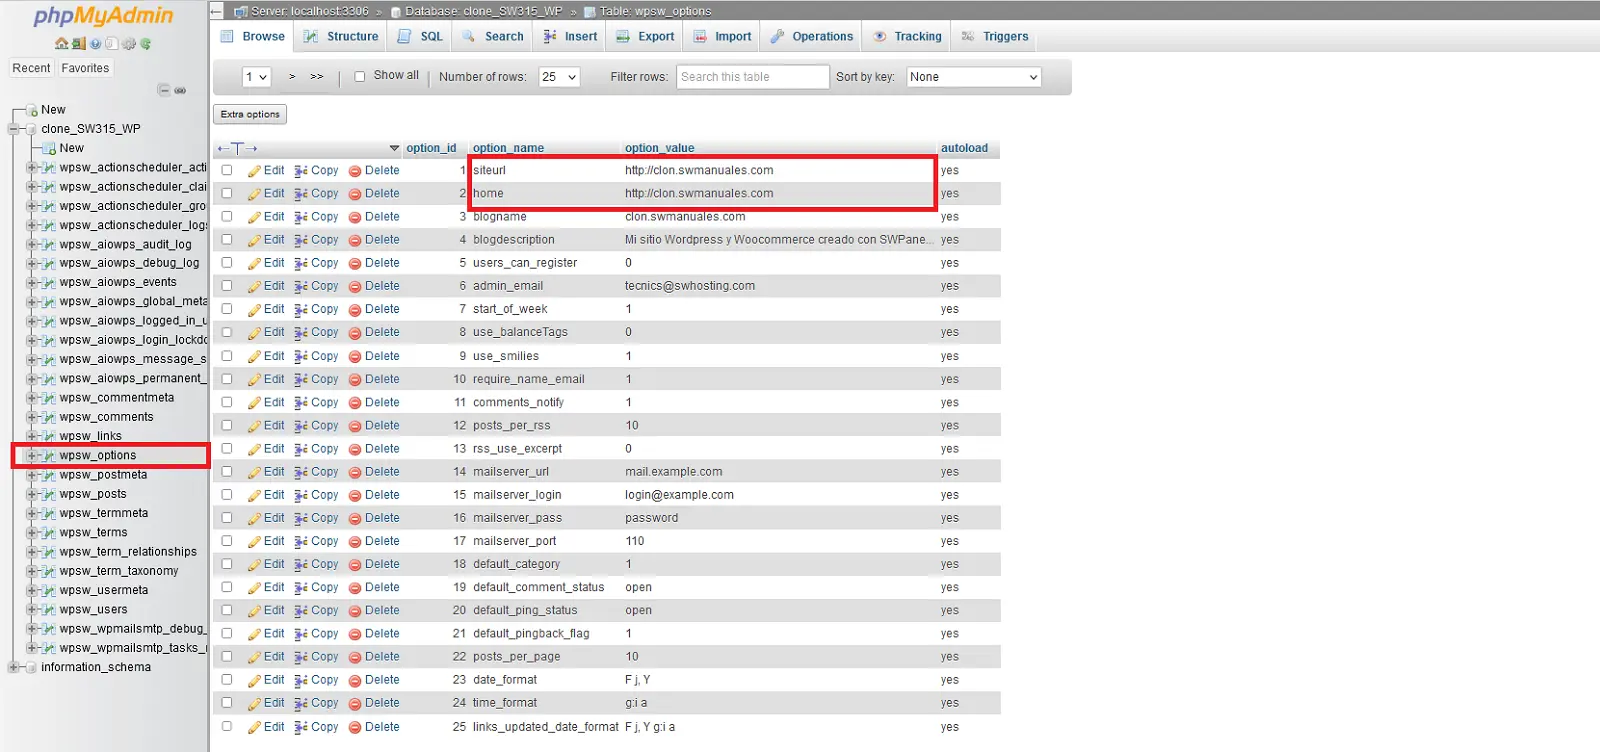
info_capture The screenshot is for guidance only. It was taken on version 2025.00.0017 with date 29/12/2024. It may differ from what the current version of SWPanel displays.
- Your WordPress will then connect to the Cloned DB and respond to the new domain name, however, in order for everything to work correctly using the new URL, it will be necessary to replace all the old URL entries in the Cloned DB with the new URL.
We can make these changes automatically, using the free plugin "Search & Replace".
To do this we will have to access the administrator area of our WordPress.
- dominionuevo.com/wp-admin
danger Important! The WordPress login and password you received in your email are not valid. Since all your WordPress data is cloned, including your username and password, you will need to use the username and password of your original WordPress for the time being.
Once inside the admin area, go to Plugins → "Add new plugin", find the "Search & Replace" plugin and click "Install now" --> Activate:
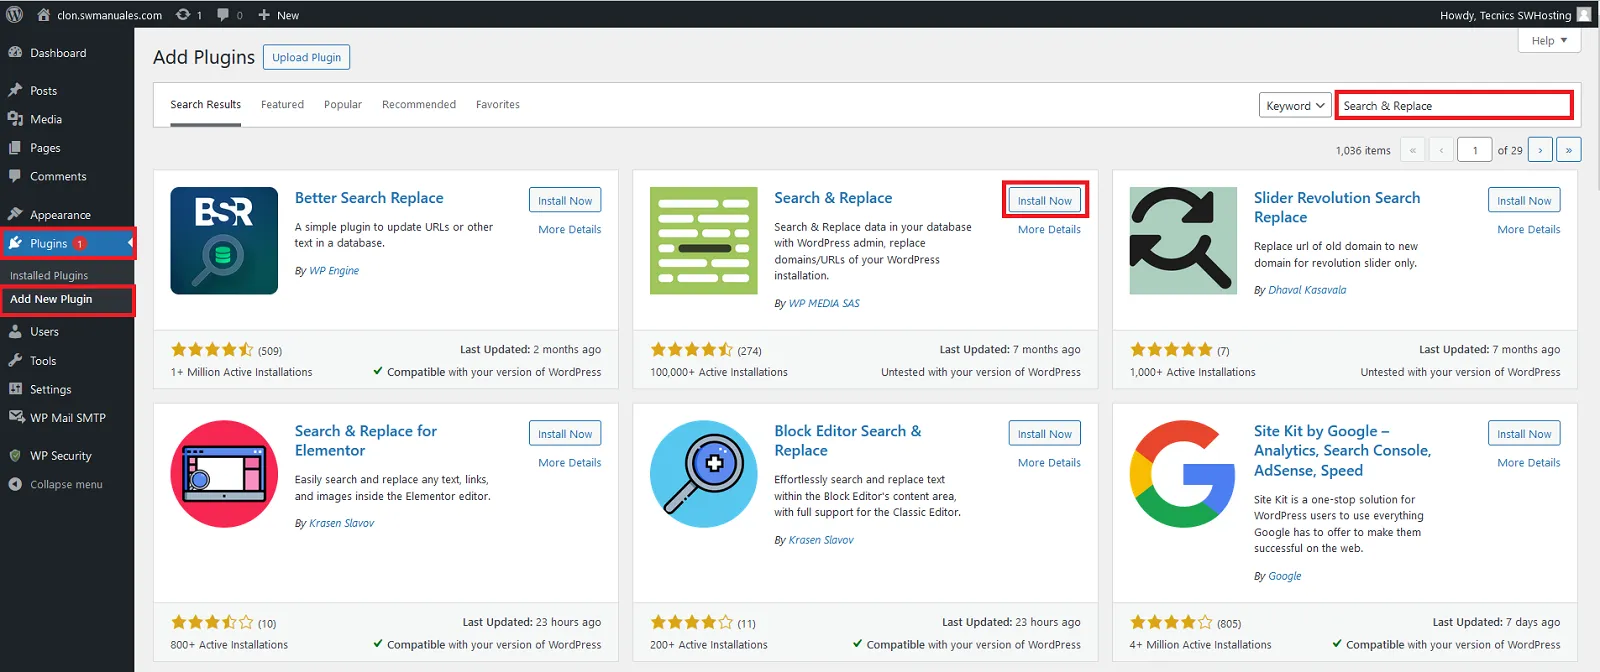
info_capture The screenshot is for guidance only. It was taken on version 2025.00.0017 with date 29/12/2024. It may differ from what the current version of SWPanel displays.
- You can access the plugin by going to Tools → Search & Replace
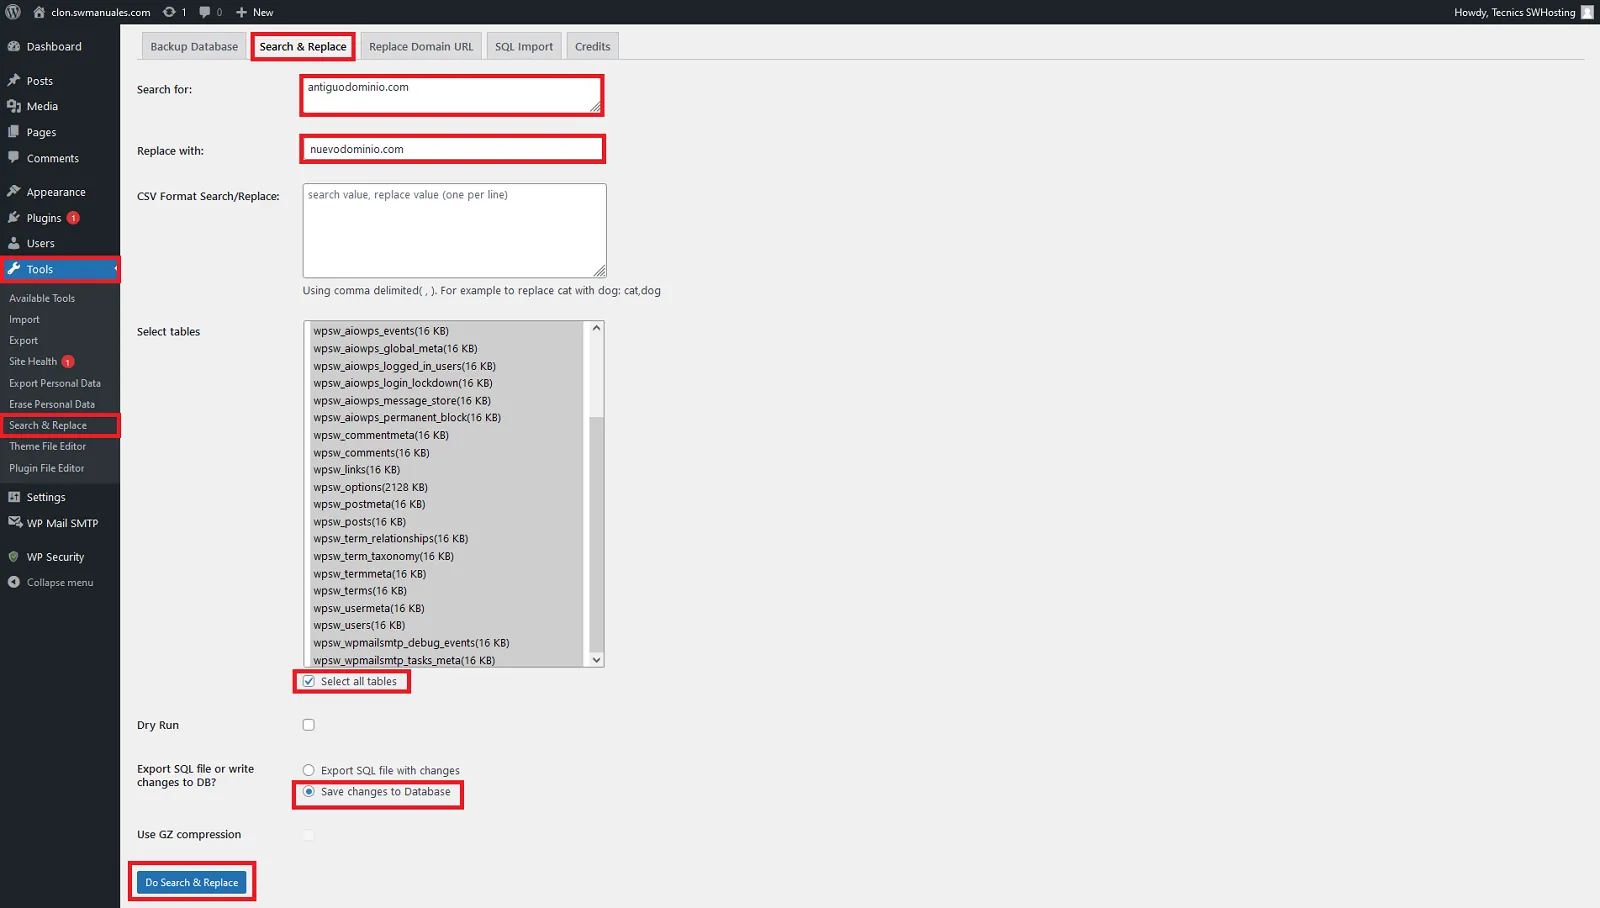
Then click on the 'Search/Replace' tab.
-
Enter your old URL in the first field called "Search by:", example: antiguodominio.com
-
Enter your new URL in the second field titled "Replace with:", example: nuevodominio.com
-
Select all tables.
-
Uncheck "Drill".
-
Select "Save changes to database".
-
Click on "Find and Replace".
info_capture The screenshot is for guidance only. It was taken on version 2025.00.0017 with date 29/12/2024. It may differ from what the current version of SWPanel displays.
danger In case the cloned website has been a subdomain of the original domain, it is possible that we have lost the access by action of the plugin. To recover it, we will have to edit again the parameters site url and home in the wpsw_options table, removing duplicate text:
info_capture The screenshot is for guidance only. It was taken on version 2025.00.0017 with date 29/12/2024. It may differ from what the current version of SWPanel displays.
success Done! Your WordPress is correctly configured with the new URL.