Content
Categories
- General SWPanel (38)
- Administration (14)
- Database (14)
- SSL Certificates (15)
- Cloud (59)
- Cloud Storage (2)
- Containers (1)
- Backup Copies (6)
- Mail (33)
- DevOps (55)
- Domains (33)
- FTP (6)
- Hosting (32)
- Migrate Services (6)
- DNS Registers (13)
- Security (12)
- Services (7)
- Support (5)
- Users and privileges (2)
- Web (15)
- WordPress (23)
Management of CMS applications (Content Management Systems)
A content management system or CMS (Content Management System) is a tool for web servers that allows the user to create, manage and publish web content without advanced programming knowledge, since, from its interface, the content of the website is controlled, maintained and published. As its name suggests, it is a system that allows us to manage content.
Depending on our needs, we will choose one or another content manager. The most popular are:
- Wordpress: Creation of web pages. Very popular for blogs.
- PrestaShop: Creation of online stores.
- Moodle: A great manager for education.
From SWPanel you have several ways to deploy some content managers:
- Services Linux Domain in Cloud or Hosting: Activate a CMS application in a matter of minutes from SWPanel.
- Cloud & Apps: Create a new Cloud with your preferred CMS pre-installed or even connect to the Cloud to install yourself the one that best suits your needs.
We explain below how to do it both ways.
Install CMS application on a Cloud Hosting service
Access SWPanel and go to the Dashboard of the corresponding service:

info_capture The screenshot is for guidance only. It was taken on version 2025.00.0017 with date 14/12/2024. It may differ from what the current version of SWPanel displays.
💡 Use the search engine at the top to quickly locate your service.
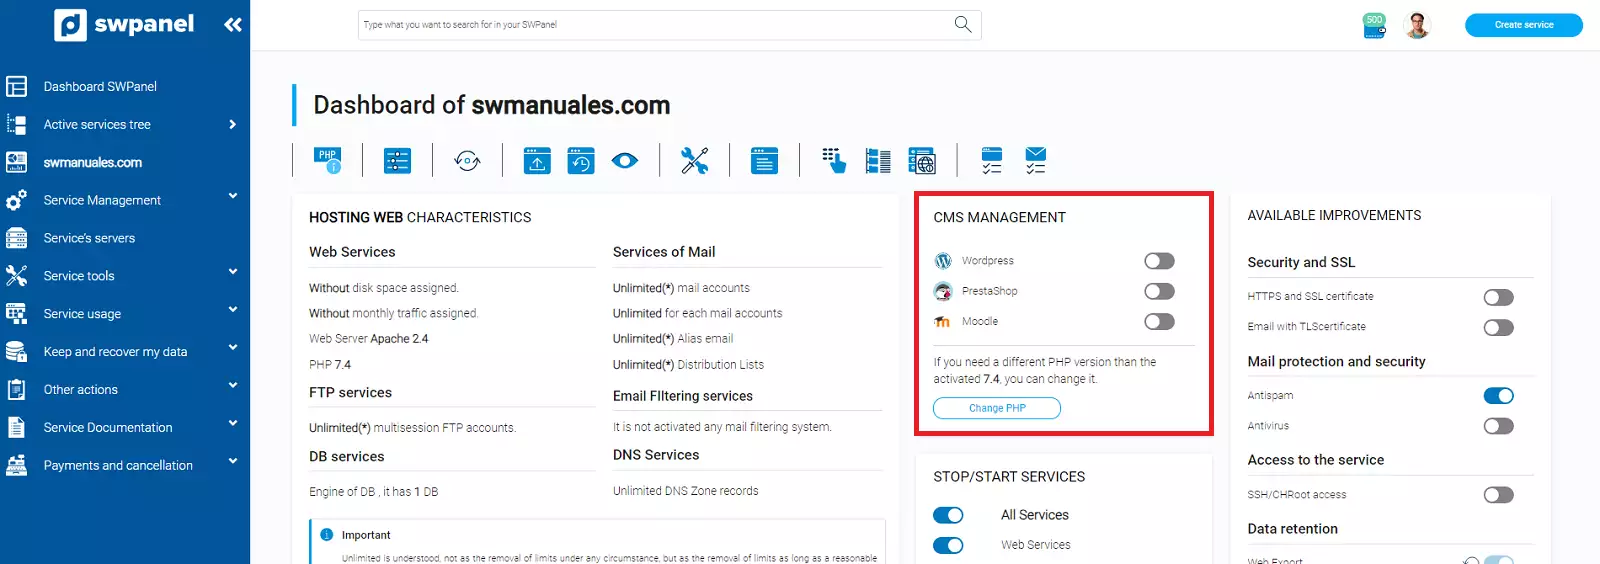
In the CMS Application Management section you can install the content manager of your choice:
info_capture The screenshot is for guidance only. It was taken on version 2025.00.0017 with date 14/12/2024. It may differ from what the current version of SWPanel displays.
You can only have one CMS application active at a time.
Your content management system will be installed in a matter of minutes.
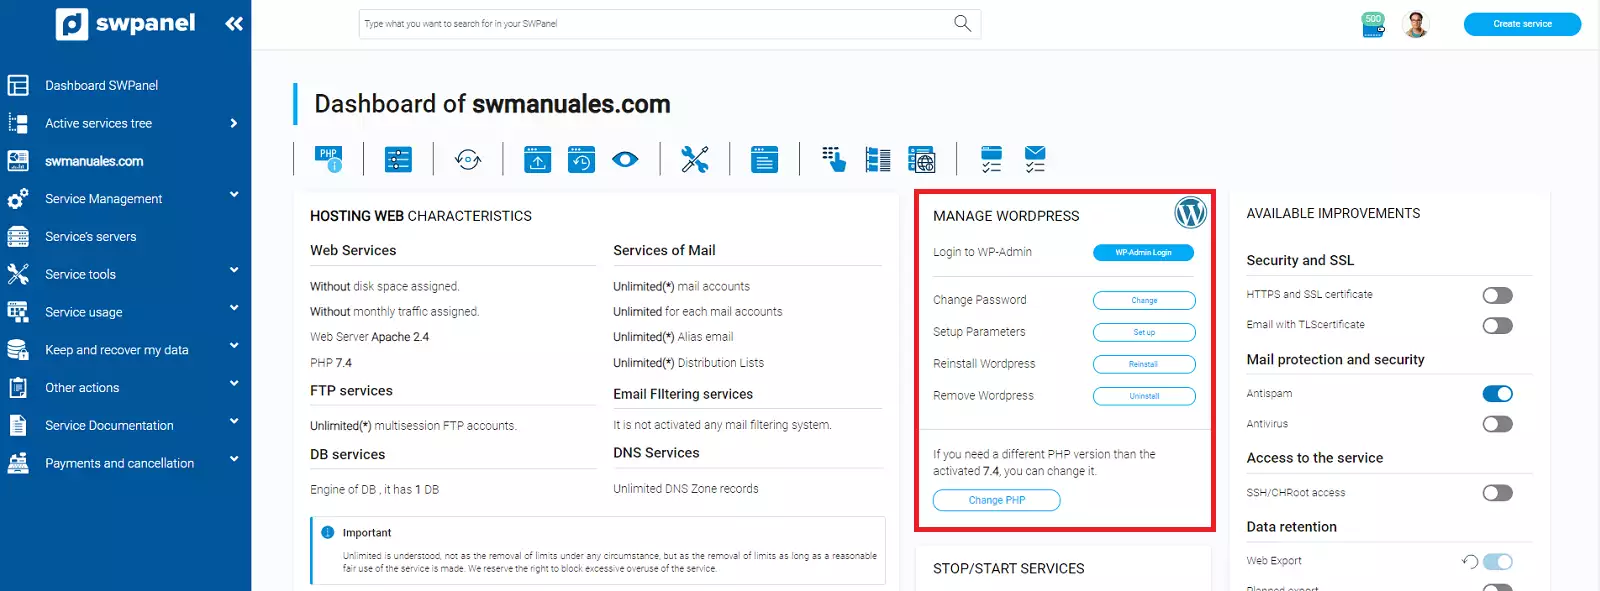
From this same section, you will be able to uninstall the CMS application.
info_capture The screenshot is for guidance only. It was taken on version 2025.00.0017 with date 14/12/2024. It may differ from what the current version of SWPanel displays.
The next step is to perform the initial configuration of the selected CMS application, we will explain it below.
Initial configuration of Wordpress
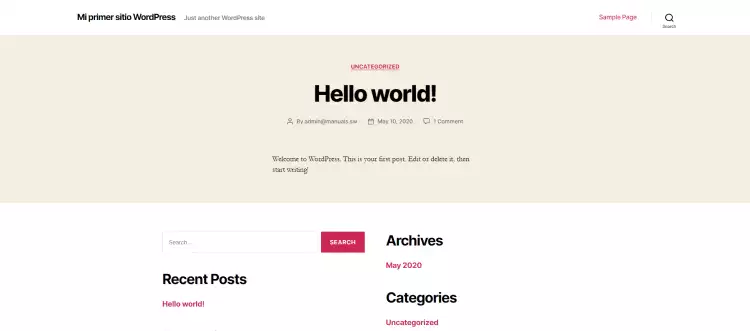
Once you have clicked install, an email will be sent to the account you have defined with the credentials to access your Wordpress.
In a matter of minutes you will have your Wordpress installed:
To access the Wordpress administration panel add /wp-admin/ to the end of your web address. For example:
http://tudominio.com/wp-admin/
https://tudominio.com/wp-admin/
Here you must enter the username and password that was emailed to you at the time of installation:

Remember that if you require additional technical support on Wordpress, you should consult their documentation or their technical support service. For quality reasons, we do not offer additional technical support on external software.
Initial PrestaShop configuration
PrestaShop CMS manager requires to finish the configuration manually, for this, you must do the following:
-
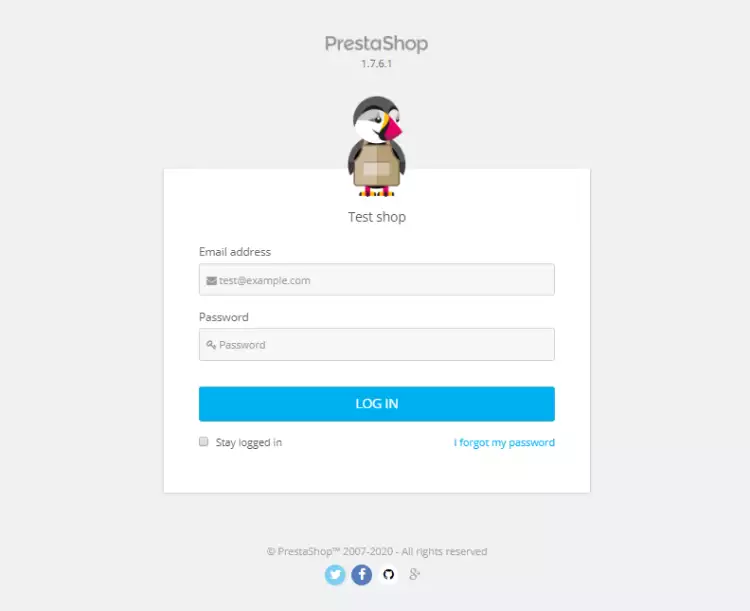
Once the installation is complete, log in to your domain. You should see a screen like the following:
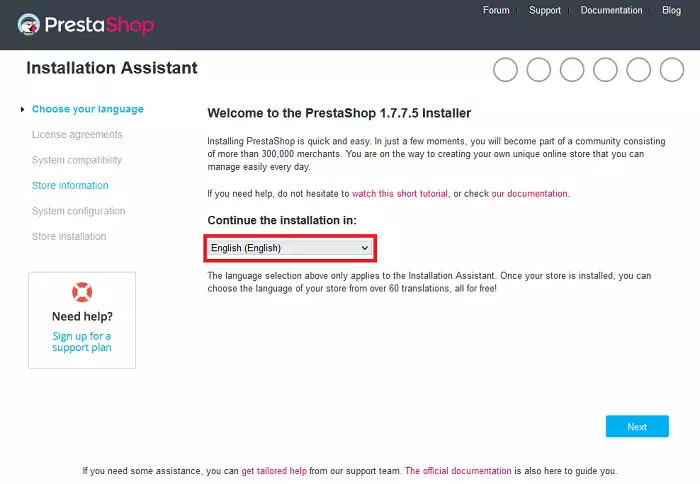
Here you have to select the language of the installation. Click on "Next" to continue.
-
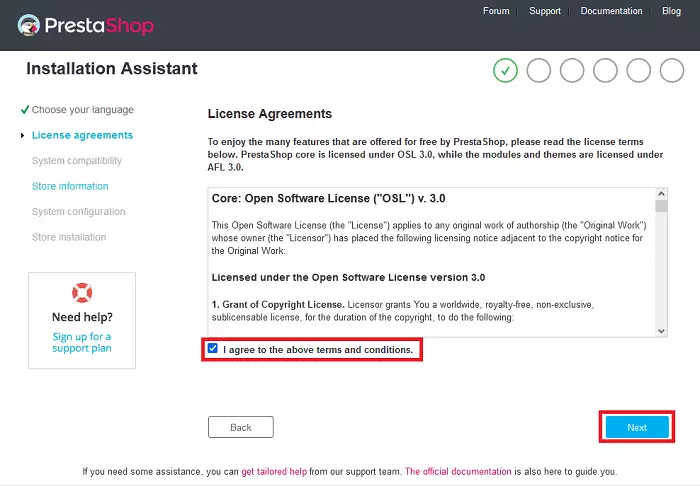
Next you will have to accept the terms and conditions of the license agreement and check the checkbox as you accept click Next:
-
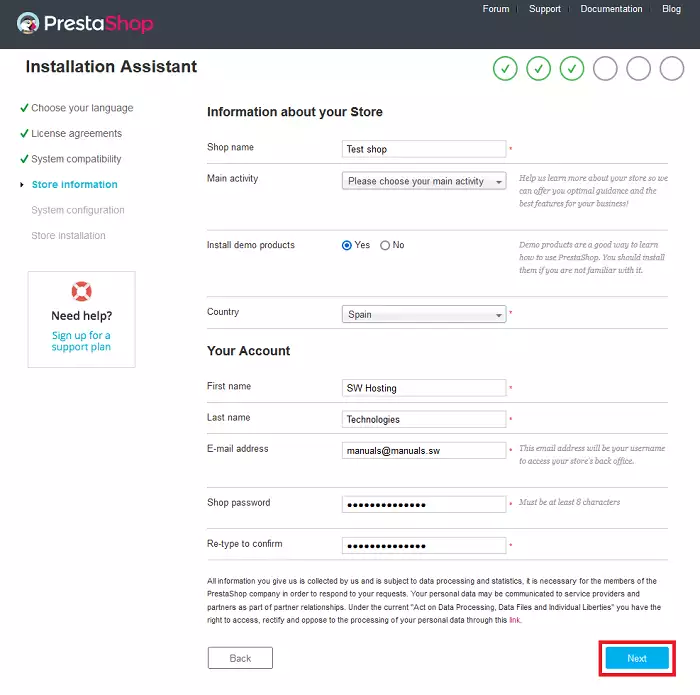
Then you will be asked for information about your new online store. Once entered, click Next:
-
In this step you must configure the connection of PrestaShop with the database. By default the correct data is set. If you would like to change them, you can do it now:

Then click on Check connection to your database!, the following message should appear:
The database is connected.If it is not correct, check the data entered.
-
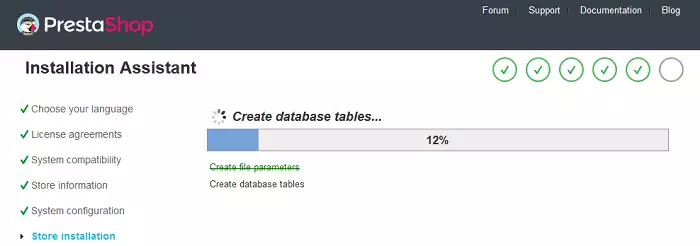
Click the Next button to continue and you will see the components of your new PrestaShop store start to be installed:
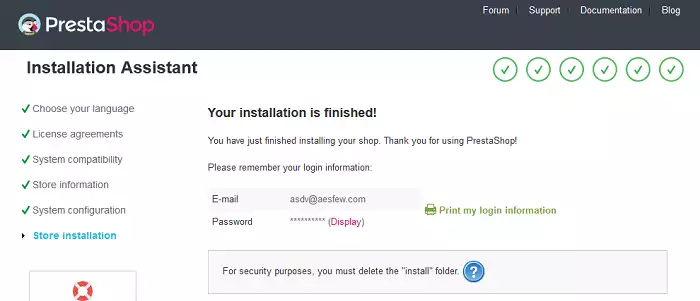
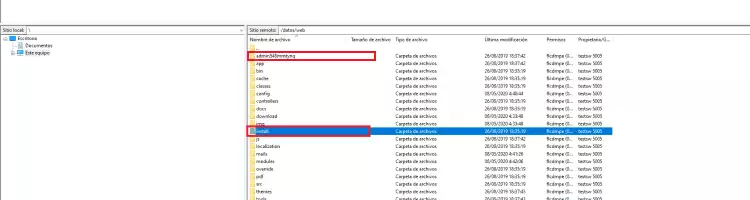
Finally, access via FTP to the web folder of your web service and:
- Delete the install folder.
- Rename the admin folder to one of your choice.
- For example, if you rename it to admin123, you will need to access the PrestaShop administration panel using the following address:
http://tudominio.com/admin123https://tudominio.com/admin123
- For example, if you rename it to admin123, you will need to access the PrestaShop administration panel using the following address:
💡 If you do not know how to access your web service via FTP, please refer to the section "Accessing the FTP server " in our manual FTP account management.
Please note that if you require additional technical support on PrestaShop, you should consult their documentation or their technical support service. For quality reasons, we do not offer additional technical support on external software.
Initial Moodle configuration
The Moodle CMS manager does not require manual configuration. To access the Moodle management panel, you will need to type the following:
http://tudominio.com/admin/
https://tudominio.com/admin/
Here you will need to enter the username and password that was emailed to you at the
Create new Cloud with pre-installed application.
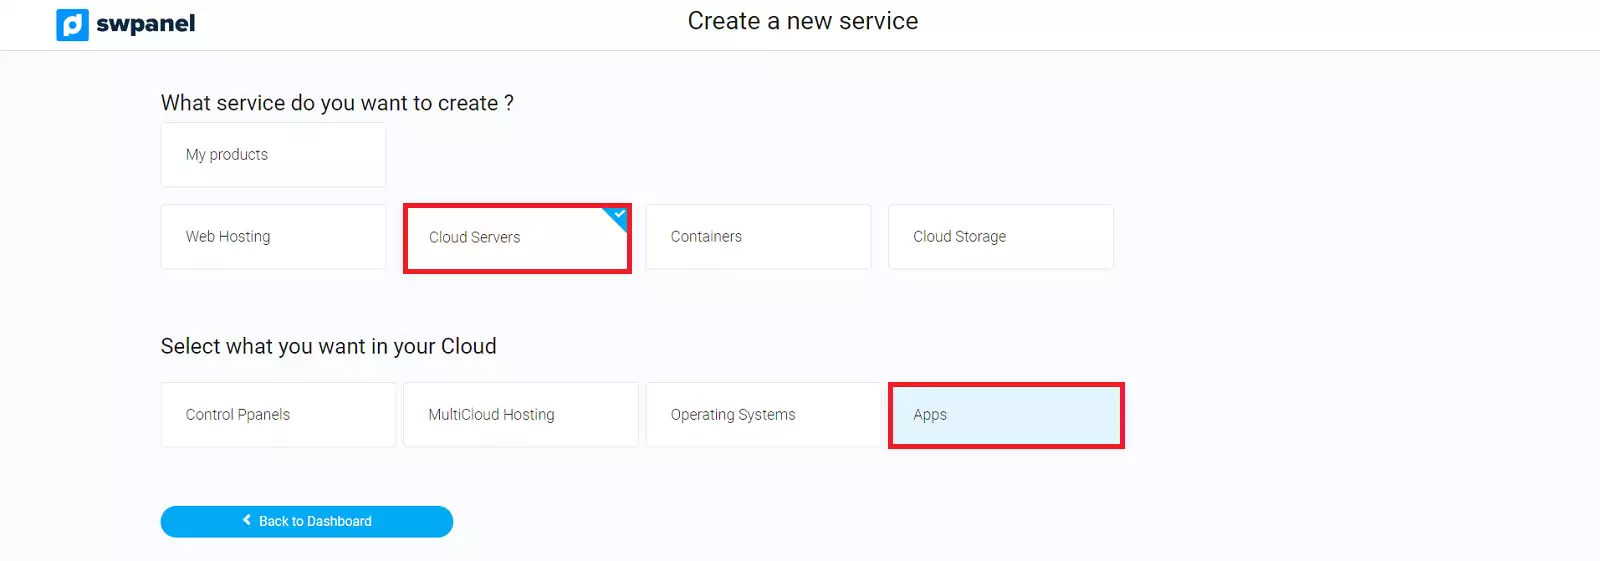
To create a new Cloud with your preferred manager pre-installed, simply access Create a Service (top right corner):

info_capture The screenshot is for guidance only. It was taken on version 2025.00.0017 with date 14/12/2024. It may differ from what the current version of SWPanel displays.
Select Cloud & Apps:
info_capture The screenshot is for guidance only. It was taken on version 2025.00.0017 with date 14/12/2024. It may differ from what the current version of SWPanel displays.
Go to One Click Apps tab:
info_capture The screenshot is for guidance only. It was taken on version 2025.00.0017 with date 14/12/2024. It may differ from what the current version of SWPanel displays.
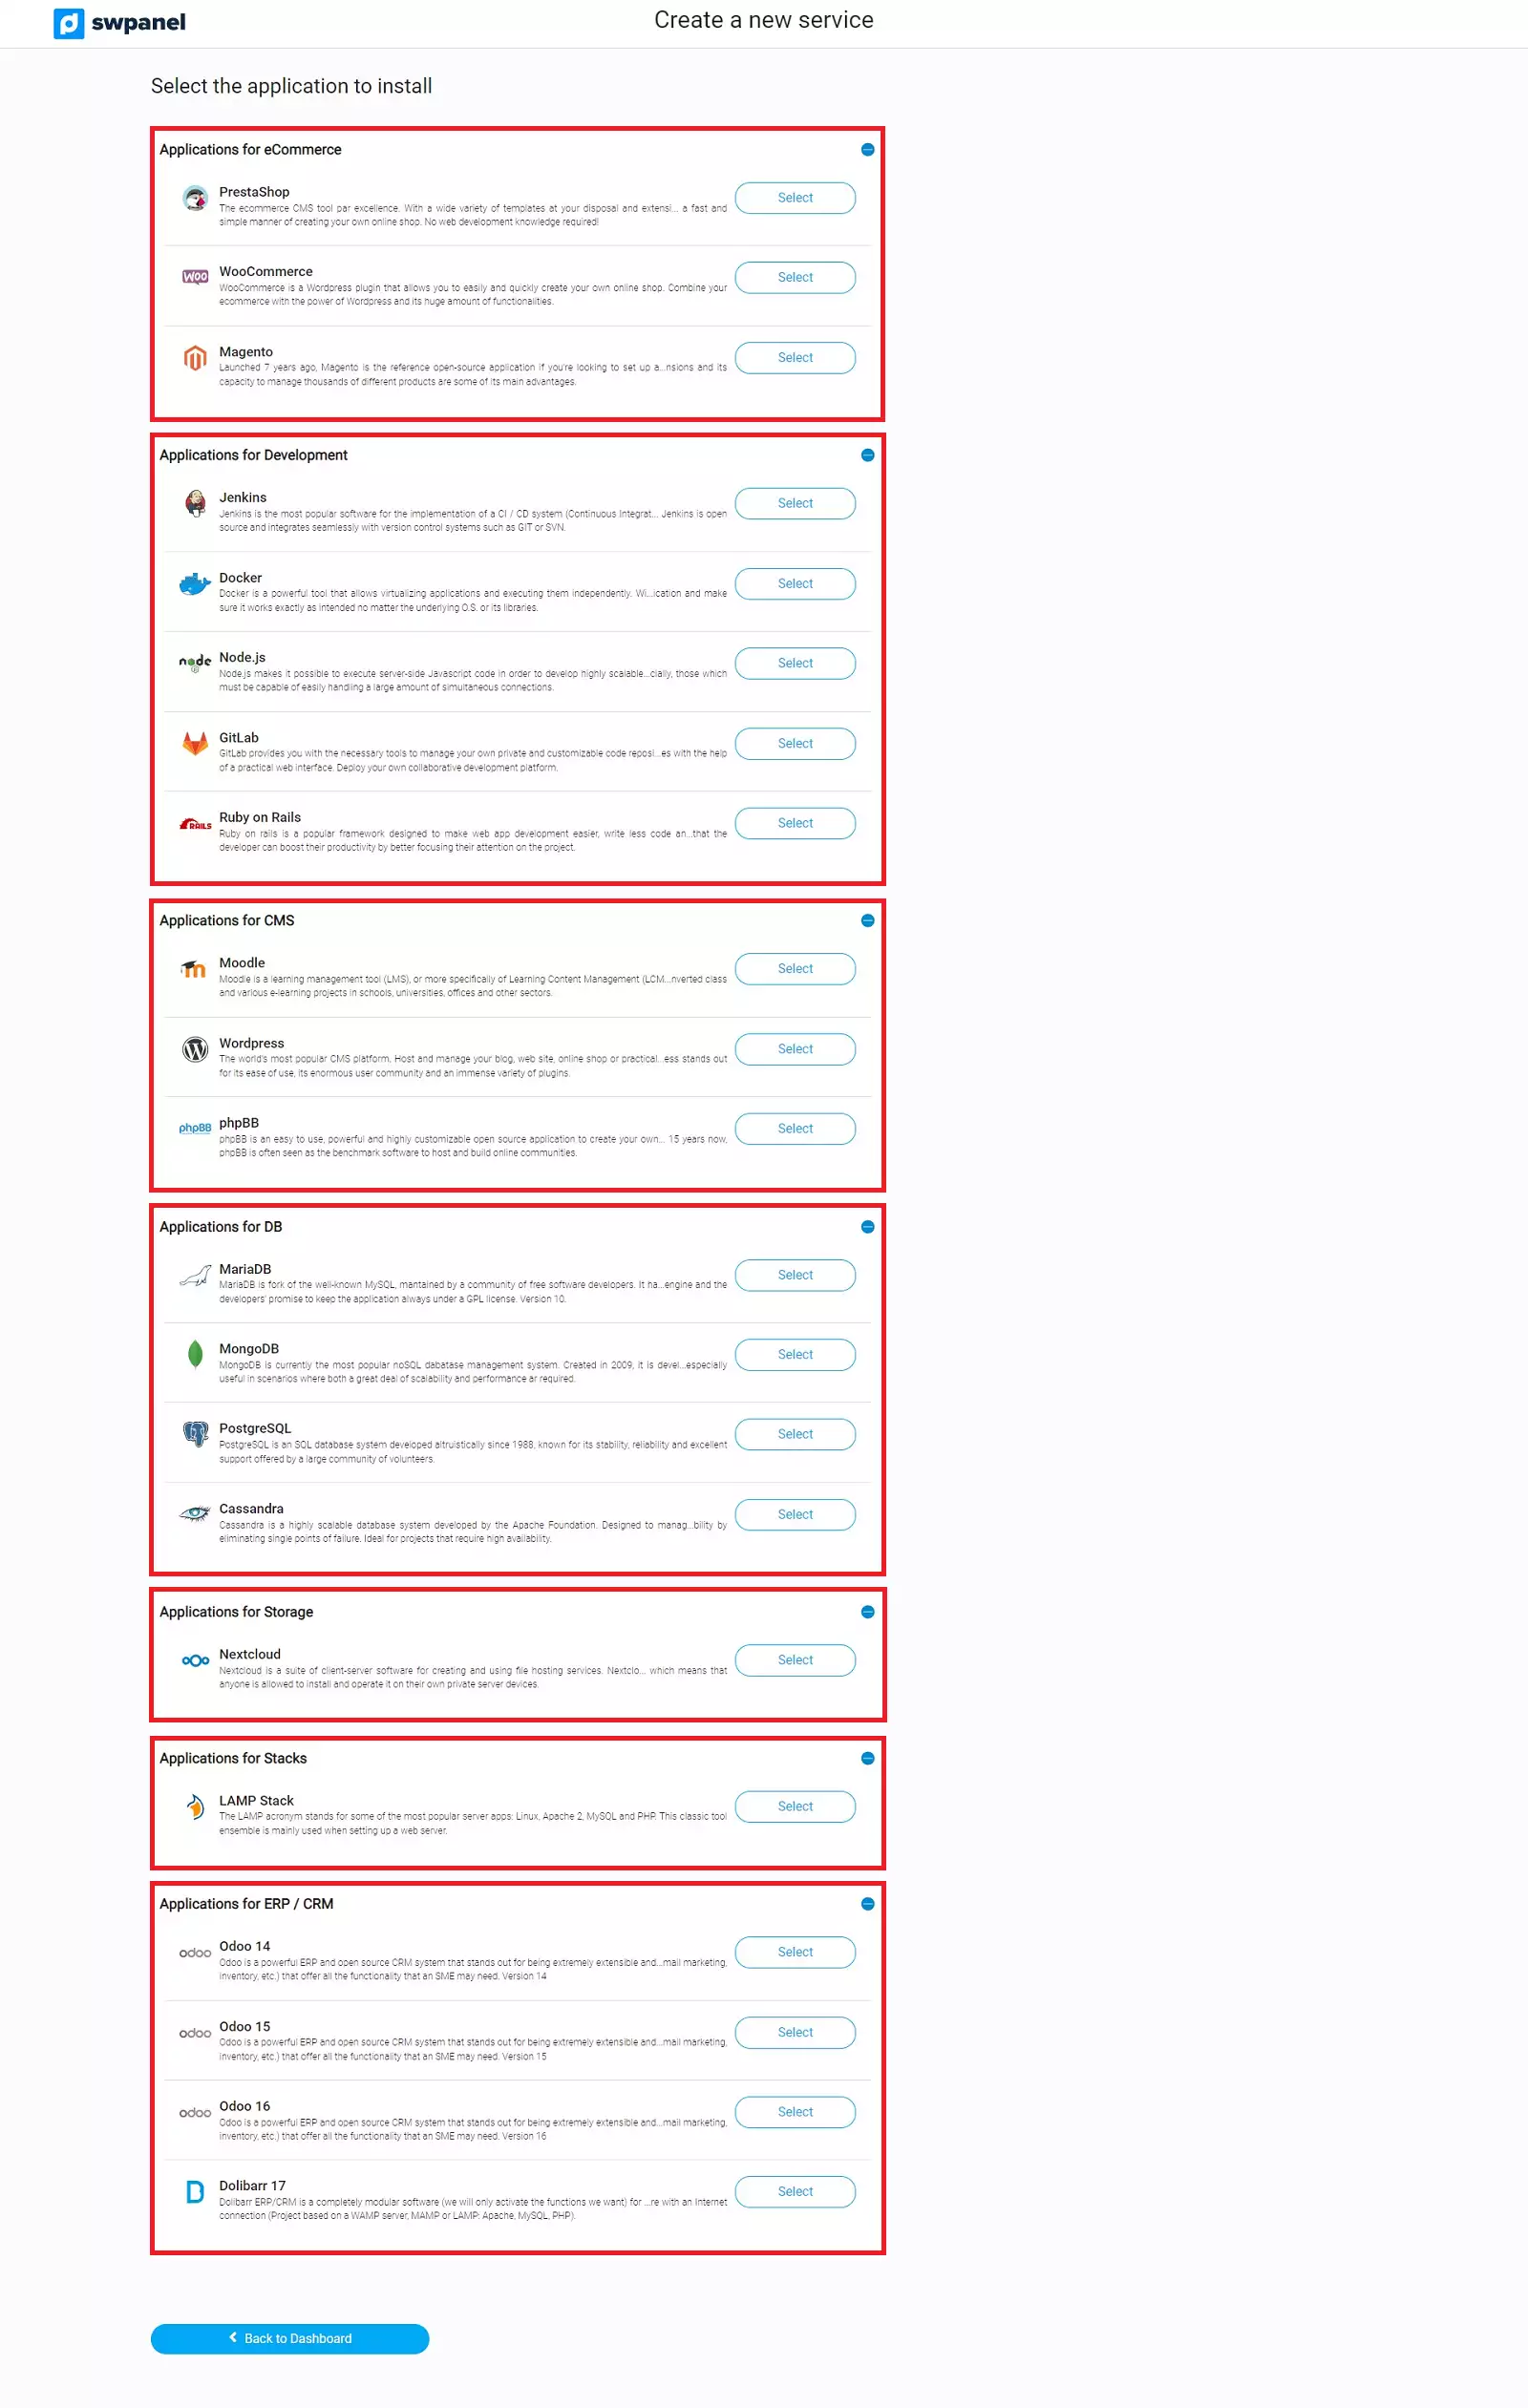
You will be able to select the application that best suits your needs.
The Cloud will be created with the selected application pre-installed.
Remember that you always have the possibility to access the Cloud and install, yourself, the application of your choice.
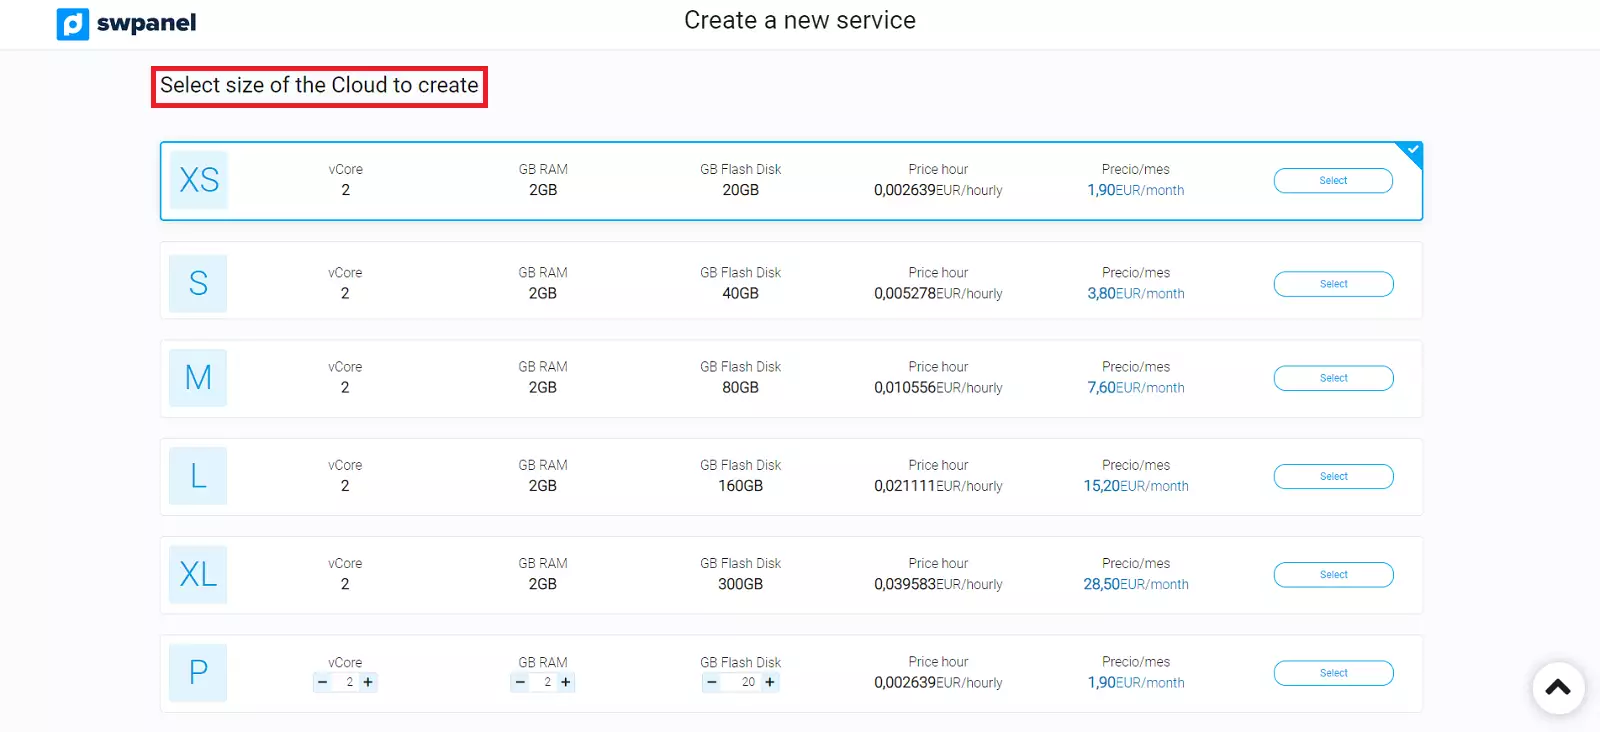
We will then select the type and size of the new Cloud:
info_capture The screenshot is for guidance only. It was taken on version 2025.00.0017 with date 14/12/2024. It may differ from what the current version of SWPanel displays.
We will finish choosing the most convenient options for our Server and we will choose the location of the same one:

info_capture The screenshot is for guidance only. It was taken on version 2025.00.0017 with date 14/12/2024. It may differ from what the current version of SWPanel displays.
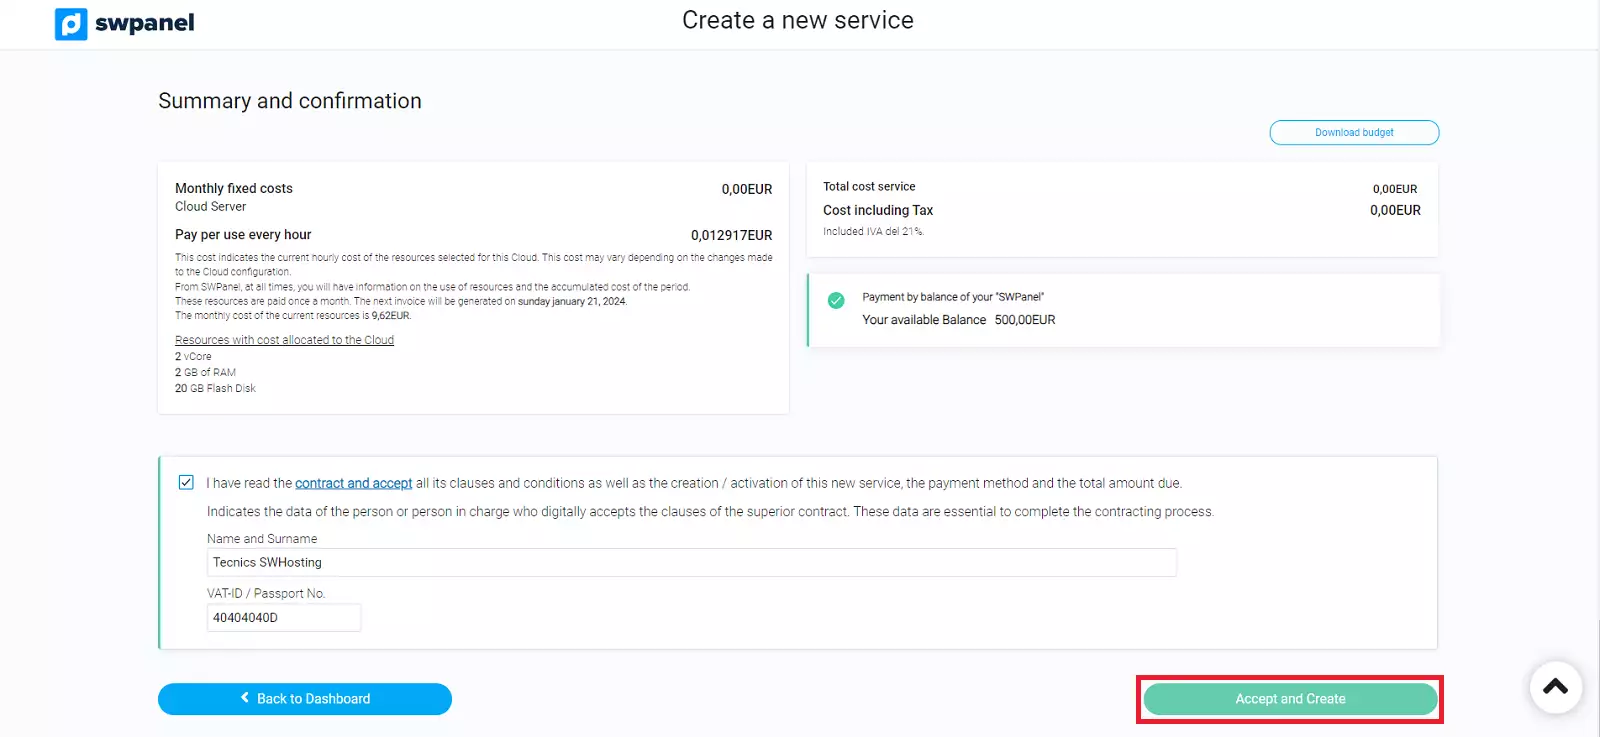
Finally, a summary with the contracting data will appear. Once you have reviewed the data displayed on the screen, click Accept and create.
💡 Click Download quote to obtain a document with the detailed characteristics of the new Cloud.
info_capture The screenshot is for guidance only. It was taken on version 2025.00.0017 with date 14/12/2024. It may differ from what the current version of SWPanel displays.
You're done! Your new Cloud with the selected application will be operational in a matter of minutes